Moroccan Geometry: S5 Class: 8-fold with folds and tajines

 Adv S5 Class: Mtemen bil Matwi w Tagjine (8-fold with folds and Tajine)


Part A: Draw the circles


1. define the center of the page, and from there, draw the center circle. It’s circumference, on a 12”x18” page, will be about 7.75” (7 3/4”), so set the compass to 3.875” (3 7/8”). Set the compass aside to use again in step 4.


2. define the horizontal through the circle. Only where the horizontal crosses the circle does in need to be marked.

3. from the horizontal crossings, set another compass with a larger radius to create two crossing arcs above and below the circle. Connect these crossings through the center, again only marking the points where the vertical crosses the circle

4. Now setting the compass point at 12:00, 3:00, 6:00 and 9:00 markings, using the original compass from step 1, draw 2 arcs from each points, to define the points where the diagonals go. Connect these diagonals, again, only marking where the line crosses the circle. Now the circle has been divided into eighths

5. Divide the circle into sixteenths by using a divider. The page only needs to be pricked where the divider pierces the circle


6. Setting another compass point where the sixteenth holes are, set the radius to just slightly less than the distance to the adjacent eighth marking. You want to make sure that the 8 circles you draw will not overlap, but only touch each other just inside the main circle.


Note: If you wish to tesselate the design, take the original compass radius, and from the centers of the 2 smaller circles above and below 9:00, define the center of the next circle by finding the intersection of two slash marks. Place the compass point at the intersection and draw another circle. This will cross through the centers of the two smaller circles. Repeat from the 6:00, 3:00 and 12:00 circles.


Part B: Divide the small circles in eighths and draw the grid


1. Hold the ruler on  vertical axis so that its edge touches the centers of the two adjacent circles at 3:00, then make a mark on the circles where the ruler crossing the edge (3 marks). Repeat with each pair of circles (if the circles are adjacent there will be 3 marks, and if the circles are separated, there will be 4 marks). 


2. Turn the paper 45 degrees and do the same thing on the \diagonal axis. Repeat again on the horizontal axis and /diagonal axis to divide all the small circles into eighths.


3. Hold the ruler vertically so that it’s edge runs along the vertical chords of the adjacent circles at 3:00, on either side of the vertical diameter, and draw a line across the page. Repeat for the next 3 pairs of circles  This will result in a total of 6 vertical lines.


4. Turn the paper 45 degrees and do the same think on the \diagonal. Repeat again on the horizontal and opposite /diagonal. Note that each of the six circles now contains a Solomon Seal.


5. Holding the page in its original orientation, identify where the horizontal lines cross each diagonal line, and draw a line the length of the page. There will be 8 lines.


6. Repeat the process, turning the page 45 degrees three more times.


Note: at this point, each circle contains a solomon seal as well as a nested solomon seal with loozat.


Part C: Additional construction lines (tajine pattern only)


1. Find the downward-pointing triangle at the junctions of each pair of circles. Make a mirror image of the that triangle by drawing a line segment between the indicated points, here circled in red, extending the line segment to where it meets the line segments at each of the 8 folds.


2. The line segments will form an octagon, which will be the base for each tajine.


3. Mark the crossings you used to draw the previous line segments.


4. Erase what's in the middle, and number those intersections as shown.


5. Placing the ruler along the points as shown, draw line segments only between the tops of the tajine bases, connecting 1-10 & 2-9, 3-12 & 4-11, 5-14 & 6-13, and 7-16 & 8-15. 


6. The construction lines for the tajine are now complete and the pattern is ready to be highlighted. 


Part D: Highlight the line segments of the pattern and channel the lines


Part E: Identify the shapes


Part F: Color the shapes


I didn't like the yellow, the green, and for that matter, the white, and definitely not how dark and almost purple the tagines,came out, so I mixed 30 drops primary yellow, 10 drops azo orange, 1 drop of primary cyan, and 2 drops of pyrrhole red to create a tan, which I then stippled over the existing yellow to create a marbling effect. Then, I brushed carmine red over the tagines to make them less puce and more maroon. Then, I used a bronze metallic on the folds. 
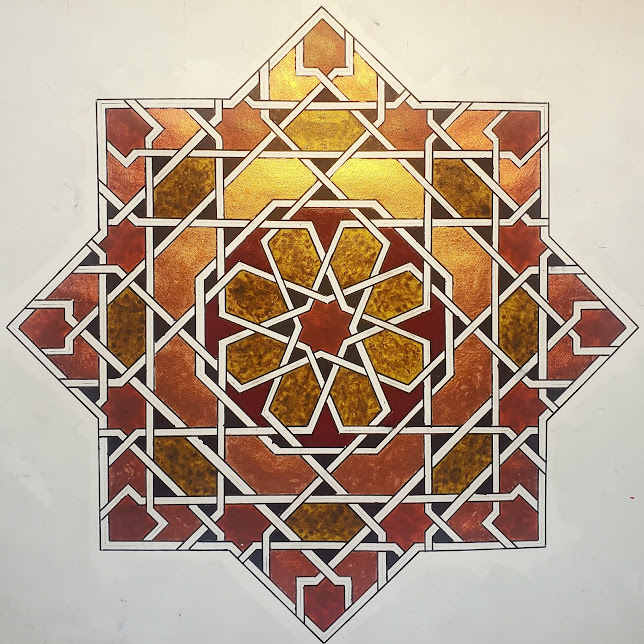


And finally, copper metallic ink for the limps on the perimeter, and now I really have the earth tone pallette I wanted in the first place.


Comments

Popular posts from this blog

Thin-crust pizza

I had a 20-year career in telecommunications engineering in my thirties and forties, at times working alongside an Italian-American guy from New York. Bob had deeply set eyes and a hangdog look, at odds with his pleasant manner. On Fridays, he'd show up at the office with a homemade pizza that he called his "garbage pie”—baked dough, sauce, cheese, and whatever leftovers were in his fridge. Pizza is a dish of humble origins, so when it became known that Margherita of Savoy, the first queen of unified Italy, loved pizza and often asked her kitchen staff to prepare it, the dish was elevated to an honored position, and the Pizza Margherita, in the colors of the Italian flag, was named for her. On a personal level, some things   about this dish are inviolable.   I’ll never let barbecued chicken or sliced pineapple  near it. Or broccolli or cannned tuna. That being said, it’s probably the most bastardized, personalized dish in the world, but I keep it simple.  I once...

Moroccan Seafood Bastilla

Moroccan seafood bastilla is a rich mixture of shrimp, calamari, and whitefish, seasoned with herbs and spices, fluffed out with cellophane noodles, and wrapped in "warqa" (Arabic word for "paper") a Moroccan filo dough made fresh daily in the souks, the large marketplaces filled with independent vendors that are in any Moroccan city of any size. In coastal cities like Essaouira and Agadir, bastilla is available in the souks in individual serving sizes .   But wherever I tried it, it seemed a little underwhelming. There was a potentially great dish there, but the flavors were muted.  It seemed strange that the seafood bastilla should be as bland as it was. After all, its cousin, chicken bastilla, albeit with a much different set of ingredients and spice mixture, is such a special occasion dish that I'd ask Nabila, our housekeeper in Fes, to make it whenever there were guests.  The typical seafood bastilla contained ingredients that I felt blunted the flavor of t...

Moroccan Geometry: S9 Master Class: 10-fold with the Eye of the Sun from Bou Inania Medersa, Fez

  Adv S9 Master Class: 10-fold with the eye of the sun, from Bou Inania Medersa, Fes Part A: Draw the main circle and subdivide it into tenths. This 10-fold design is based on 2 concentric circles. These two fully contain the 4 central shapes. 10 other overlapping circles whose centers are outside of the outer circle complete and contain the remaining shapes. The first of the 2 concentric circles to be drawn is the outer one 1.  We want the finished drawing to fit with 5 mm margins above and below. The ratio of the circle's radius, A, to the distance between the center and the outer point of the pattern, B, is approximately 5 to 7. Using a watercolor paper that is 304mm high, B should be no more than 304mm, minus the 5 mm margins, then divided in half, or 147 mm. So then A, the radius of the main circle, should be about (5/7) x 147 mm, or about 105 mm. Use the usual method of finding the center of the page, draw a circle of the desired radius and quarter the circle with horizo...