Moroccan Geometry: S7 HW: 12-fold with ball (Tanashri bl kora), with examples of over-under channeling.
Moroccan Geometry: S7 HW: 12-fold with ball (Tanashri bl kora) (تناشرث بل كورة)

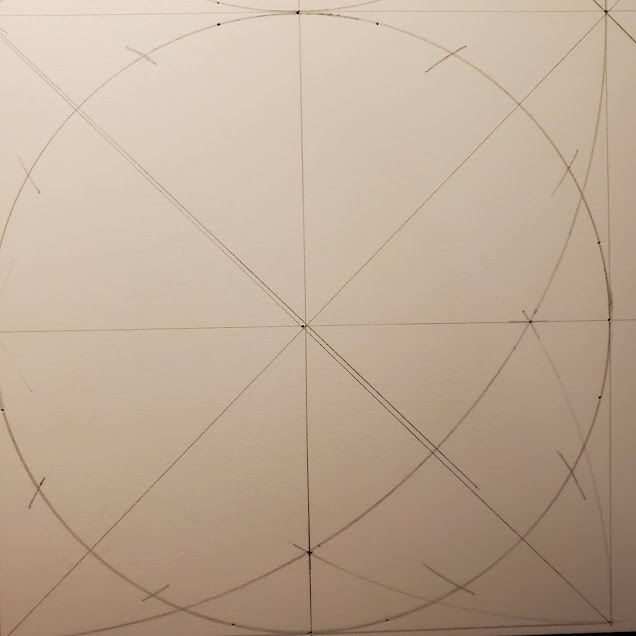
1. Draw a circle the size of the page. This will be divided into 12ths.
Note: The ratio of the circle diameter to the height and width of the finished design is roughly 5:3. For 12"x18" paper, if you wish to make the finished design larger so that it takes up nearly the size of the page, you'll need to take an extra sheet and divide it into two pieces along the horizontal, then tape the pieces to the top and bottom of the page as shown. A circle with a 9" radius will take up the entire 18" page, and will yield a finished design approximately 18"x3/5, or 10.8", leaving margins of 1.1" on the top and bottom. To yield a larger design, you'll need to tape 1" strips to each side of the page, which would allow for up to a 20" diameter (10" radius), and a finished design of 20" x 3/5, or 12", which would take up the entire page with no margins. A 9.4" radius should yield margins of a little over 1/4".


Divide the circle into 4ths by first drawing the horizontal, then find the vertical using the arc method and a second compass with a larger radius. Place the point at 3:00 and 9:00. Then use the compass with the original radius and with the point at the 3:00, 6:00, 9:00, and 12:00 points, draw intersecting arcs such that the arcs intersect the circle. These intersections with the circle will mark the 1:00, 2:00, 4:00, 5:00, 7:00, 8:00, 10:00 and 11:00 points.


At the point where the arcs from the previous paragraph intersect (indicated by the yellow circles), draw a square frame around the circle. Make a rectangular grid by drawing two lines vertically (from the red intersections at 7:00 & 11:00 and 1:00 & 5:00) and horizontally (from the blue intersections at 2:00 & 10:00 and 4:00 & 8:00) through the division marks closest to the center vertical and horizontal.


2. Draw diagonals through the squares, three diagonals from NW to SE (the main diagonal and diagonals from 12:00 to 3:00 and from 9:00 to 6:00) and three from SW to NE (the center diagonal and diagonals from 12:00 to 9:00 and from 3:00 to 6:00), so that each quadrant is divided into eight triangles.


2. Draw diagonals through the squares, three diagonals from NW to SE (the main diagonal and diagonals from 12:00 to 3:00 and from 9:00 to 6:00) and three from SW to NE (the center diagonal and diagonals from 12:00 to 9:00 and from 3:00 to 6:00), so that each quadrant is divided into eight triangles.

Above: View of entire pattern divided into 4 quarters.
3. Draw a circle in each quadrant. Try to make sure the circles touch each other. Divide each circle into 12 parts by placing the point of the compass at N, S, E, & W, and making 2 marks along the circumference from each point. Further subdivide each circle in to 24 parts by using the dividers to find distance between the diagonal and the adjacent mark that you just made, and then use the dividers to mark those points (8 points per circle, since the diagonals already mark 4 of the points) from N, S, E, W.


4. Draw a circle within each of the circles from step 3. The radius is equal to the radius of that circle minus the divider distance between 24ths.


6. Connect the following points of the inner circles: A to F & L to G, extending the lines until they reach another circle. Repeat on all circles. Do the same with the horizontals, C to J, and D to I. Repeat on all circles.
7. Now connect the following points: B to G and A to H, extending the lines to the frame edge or another circle, whichever comes first. Repeat on the diagonals K-D and J-E, then L-E and K-F, and finally C-H and B-I.
8. Now connect the 12 un-numbered marks on the outer circles to form the ends of the sfet shapes, the qandeels, the kora and all the other shapes that emerge where each of the quarters meet. These are the points that appear as 12:00, 1:00, etc.

9. You may now highlight the lines you’ll keep in the pattern, and detach any excess paper used in creating the construction.


After inking the channel lines, erase all other lines and smudges to clean up the surface for inking the shapes with color.


5. Number 12 divisions of the outer circle, not like a clock, but as if the circle has been rotated 15 degrees, using the diagonals and the marks created with the dividers. Mark the same points on the inner circle, just marking the points where a straight edge lines up from 1 to 7, 3 to 9, 4 to 10, and 6 to 12. 2 to 8 and 5 to 11 are already connected by the diagonals. Label these points on the inner circle with the letters A-L.

6. Connect the following points of the inner circles: A to F & L to G, extending the lines until they reach another circle. Repeat on all circles. Do the same with the horizontals, C to J, and D to I. Repeat on all circles.
7. Now connect the following points: B to G and A to H, extending the lines to the frame edge or another circle, whichever comes first. Repeat on the diagonals K-D and J-E, then L-E and K-F, and finally C-H and B-I.
Thus, each point on the inner circle will be intersected by 2 lines, and points B, E, H, & K will also be intersected by a previously drawn diagonal from step 2.
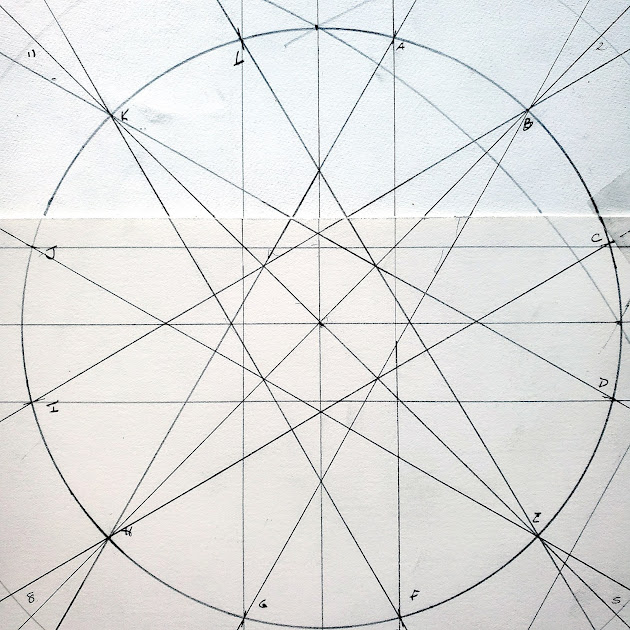


8. Now connect the 12 un-numbered marks on the outer circles to form the ends of the sfet shapes, the qandeels, the kora and all the other shapes that emerge where each of the quarters meet. These are the points that appear as 12:00, 1:00, etc.

9. You may now highlight the lines you’ll keep in the pattern, and detach any excess paper used in creating the construction.

At this point, if you are channelling the lines, it is useful to erase the construction lines before preparing the channels.

When channeling lines, be sure to use a small compass to set a circle at the endpoint of each line segment. Be careful to avoid mistakes when drawing the over-unders.

Be careful to avoid mistakes when drawing the over-unders. Choose the order and keep repeating the sequence. Work from the center outward. When completing an over-under channel sequence, its helpful to erase inside the over-lapping channels to avoid mis-identifying them as you continue to work outward. Take particular care where channels make turns, especially turns greater or less than 90 degrees.


The pattern is now ready for inking. After the channel lines are inked, the center lines may be erased.

Ink the channel lines. For this, I used a 1.9 nib on a Lamy AlStar fountain pen.

After inking the channel lines, erase all other lines and smudges to clean up the surface for inking the shapes with color.

Notes on color: Amsterdam drawing inks: Kora: Light Gold. Sfet Tanashri: Emerald Green w/ Pearl Green Wash. Qandeel: Primary Yellow w/ Pearl Yellow wash. Sfet: 1:1 ratio Olive Deep Green & Primary Yellow. Looza: Yellowish Green. Khatem Tanashri: Olive Deep Green w/ Pearl Green Wash


Decided to to a Pearl Green wash over the emerald green arrowheads:


Comments
Post a Comment